 Your job as a trials healer is not only to keep the entire group alive, but to also provide buffs to your group and debuffs to enemies so that your group can achieve better scores and smoother runs. Healing is often a stressful role to play, especially in less experienced groups that won’t stack up nicely for you, but is very rewarding when no one dies and you’ll have people thanking you for it.
This healing build is not a static build. Typically, trials healers have a variety of sets that they use interchangeably for different situations and with different fellow healers (you’ll usually always have two healers in each trial because most of their buffs only affect six players at any one time). If you want to be completely ready for every trials healing situation that currently exists, it is recommended you collect all these sets and level up all these skills.
For a link to all the stats as projected in the UESP build editor, click here.
Building your healer
Attributes: 24 Health, 40 Magicka
Because of the food we’re using, we want to put a bit into health to bring us up to a healthy level.
Race: Breton
Any race can heal effectively, but if you want to get the most out of your build, you have a few choices you can go with, but in my opinion, Breton has the best passives for healing in the Morrowind patch. The next best choice would be Argonian and then High Elf.
Mundus: The Ritual
A strong passive, granting about +15% to healing power with all Divines. If you find that you’re running low on Magicka, you can choose The Atronach instead.
Champion Points
- Blessed: 100
- Elfborn: 100
- Magician: 100
- Arcanist: 100
- Warrior tree points depend on your content
This setup will give you the strongest heals and the best sustain in the Homestead Patch.
Food: Witchmother’s Potent Brew
This is a nice tri-stat delicacy that will give you Maximum Health, Maximum Magicka and Magicka Recovery. The amounts of Magicka and Health won’t be as high as a bi-stat food, but it’s better to have access to more stats and then to adjust attributes accordingly.
Potions: Spell Power, Spell Critical, Restore Magicka
Potions for healers aren’t critically important. In the current patch, I get away with using trash pots, those Essence of Magicka potions you pick up from mobs. If you want to get the best out of your healing however, the Spell Power Potions will give you the best bonuses and sustain for your healing. Major Prophecy, Major Sorcery, Major Intellect and restores Magicka. You can make these potions with Corn Flower, Lady’s Smock and Water Hyacinth/Namira’s Rot.
Vampirism
You may want to be a vampire for the increased Magicka and Stamina recovery at level 2, and the Undeath at level 3, but beware going into certain situations such as in Hel Ra Citadel or City of Ash that the fire damage can be overwhelming. Consider what damage you’ll be facing and whether or not you should feed before you go.
Item Sets
There is no definitive setup for a healer. You need a variety of sets ready to go to adapt to the situation and to coordinate with your fellow healer.
Finalised Trial Sets
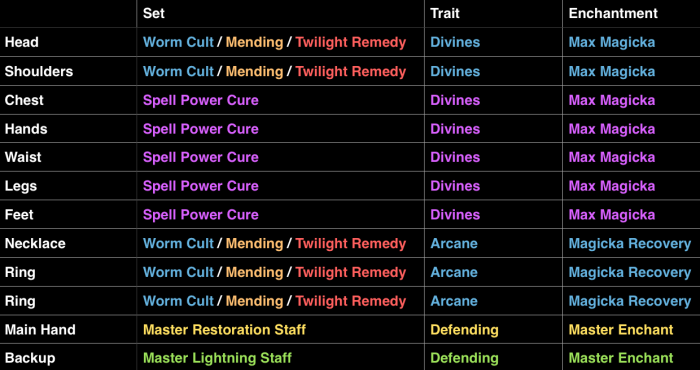
This is the typical selection of gear that you would want to have for trials. The staves will require completions of Veteran Dragonstar Arena, which can prove somewhat tedious at times. This setup is still what you would want to have, regardless of which staves you use.
Monster Helm Setups
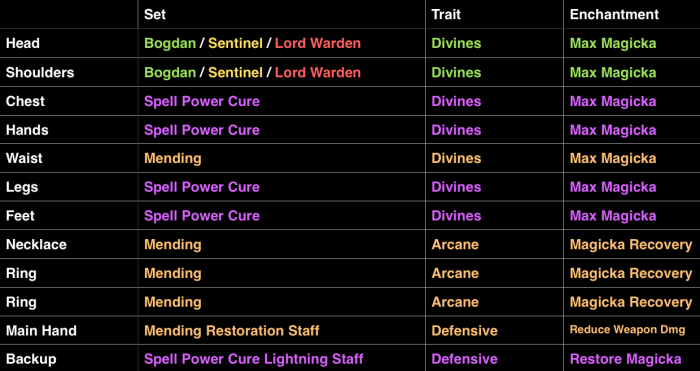
Fitting the required sets in alongside a monster helm is quite tricky and could prove problematic under stressful healing conditions, but if you can pull it off, the best way to do it is with Mending and SPC combination. Before switching to your SPC lightning staff, try and have a lot of heals-over-time (HoTs) down.
Just Warming Up
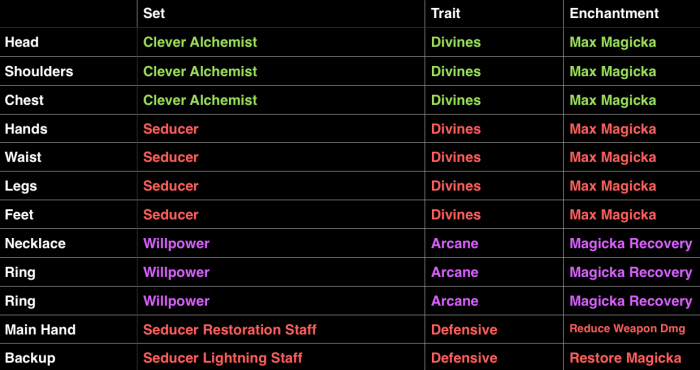
This setup is made up of sets that can be crafted, excluding the Willpower set. It is geared towards new healers and provides a great start for anyone looking to get into healing in PvE. Seducer will give you a nice sustain to help in stressful situations whilst Clever Alchemist will give you a decent health boost.
Skills


Front Bar: Restoration Staff
Your front bar is your essentials bar. It features spammable heals and defensive abilities and you should have skills on this bar that you would use in more stressful situations where bar swapping could get you in trouble.
Healing Springs: Summon restoring spirits with your staff, healing you and your allies in the target area for 1773 Health and an additional 1773 Health every 1 second for 3 seconds. You restore 338 Magicka for each friendly target hit by the initial heal, up to a maximum of 3 targets.
The bread and butter area heal that can stack. You can stack as many as these as you want, limited by how fast you can cast them. They last three seconds and replenish around 1000 Magicka if you manage to get three allies in the heal. A very good skill in prolonged stressful situations where your team isn’t moving around.
Breath of Life: Beacon your inner light, healing yourself or a wounded ally for 8854 Health. Also heals one other injured target for 4430 Health.
The oh-shit single target heal bomb that can bring an ally back from the almost dead. Breath of Life also hits another target for half the amount. Ideal for times where one ally is taking a lot of single target damage, and best used sparingly. In the Morrowind patch, it will only heal allies in front of you.
Combat Prayer: Slam your staff down to activate its blessings, healing you and your allies in front of you for 4556 Health. Also grants Minor Berserk, Minor Resolve, and Minor Ward, increasing you and your allies’ damage done by 8% and Physical Resistance and Spell Resistance by 1320 for 8 seconds.
We use this ability at least once every 8 seconds to get the Minor Berserk damage buff for all our DPS in the area of effect. Only affects 6 players at a time so needs to be run by both healers.
Channeled Focus: Create a rune of celestial protection, which defends you while you stand within it and for up to 8 seconds after leaving it. The rune grants you Major Resolve and Major Ward, increasing your Physical Resistance and Spell Resistance by 5280. You also recover 120 Magicka every 0.5 seconds.
A great buff to resistances, giving you about an 8% overall damage reduction. Also provides a flat 480 Magicka Recovery, and procs your Sacred Ground passive. You can move away from this skill for 8 seconds and still have the same bonuses. At a cheap cost, there’s no reason not to run this.
Harness Magicka: Surround yourself with a net of magic negation to absorb up to 11219 damage over 6 seconds. While active, up to three times when spell damage is absorbed, you restore 991 Magicka. Each piece of Light Armor worn increases the Magicka restored by 6%.
Sometimes you need to give yourself a shield to buffer yourself against certain mechanics. Seeing as Breath of Life isn’t guaranteed to hit you, you cannot always rely on it to bring you back up. A great example of where this skill is very necessary is on the Storm Atronach boss in Aetherian Archive.
Solar Prison/Disturbance: Call down a fragment of the sun to the target area, dealing 3041 Magic Damage each second to enemies and reducing their damage done by 30%. An ally can activate Gravity Crush, dealing 11616 Magic Damage to all enemies in the area and stunning them for 5 seconds.
Both morphs are good. The main debuff that comes from running this is an unnamed 30% damage reduction from enemies within its area of effect. This stacks with Major and Minor Maim. Should only be used in situations that warrant it. Aggressive Horn is overall a better skill to be using.
Back Bar: Lightning Staff
This back bar is more for group utility and it is required that you run a Lightning staff if you are the healer that needs to proc Off-Balance. Some skills are flexible because your fellow healer may use them but there are backup skills you can slot.
Energy Orb: Project a globe of regeneration that floats forward, restoring 825 Health to nearby allies. An ally can also activate the Healing Combustion synergy, healing themselves for 5729 and restoring 0 Magicka instantly and 1% Magicka over 10 seconds to nearby allies per enemy hit.
This healing orb provides strong group heals, but its main purpose is to provide a Synergy to your group members. In the Morrowind patch, this ability will restore some of your maximum resource back to you, and will be very necessary.
Blockade of Storms (flex): Slam your staff down to create an elemental barrier in front of you, dealing 1432 Magic Damage to enemies in the target area every 1 second. Gains a new effect depending on your staff type: Blockade of Storms sets Concussed enemies off-balance.
Only one healer needs to run this most of the time. With the current DPS meta revolving around the Exploiter passive (+10% damage against Off-Balance targets), the healer is required to run a lightning wall so that the DPS can continue to run fire walls. It provides a substantial DPS boost to your group by setting Concussed targets Off-Balance.
Luminous Shards: Send your spear into the heavens to bring down a shower of divine wrath, dealing 3248 Magic Damage to enemies in the target area and disorienting one enemy for 6 seconds. While active, an ally can activate the Luminous Shard synergy, restoring 25% of their Max Stamina and an additional 1875 Stamina and Magicka over 10 seconds.
You may wish to skip this ability entirely in the Morrowind patch, as it mimics what Necrotic Orb does. It is however easier to pick up off of the ground but only one can be placed at a time. In the Homestead patch, it replenishes a huge amount of Stamina and a little bit of Magicka, so until Morrowind arrives, keep this ready for thirsty tanks or stamina DPS.
Radiant Aura (flex): Champion the cause of divine glory to apply Minor Magickasteal to all enemies around you for 15 seconds, causing you and your allies to restore 400 Magicka every 1 second when damaging them. While slotted, you gain Minor Fortitude, Minor Endurance, and Minor Intellect, increasing your Health, Stamina, and Magicka Recovery by 10%.
Only needs to be run by one healer. This skill applies the Minor Magickasteal debuff to all enemies within 28 metres and gives minor buffs while slotted. Effectively this skill replaces Elemental Drain, except in certain situations where the penetration is necessary. Everyone in your raid will love you if you keep this skill up.
Extended Ritual: Exalt in the sacred light of the Aedra, cleansing up to 5 harmful effects from yourself immediately and healing you and nearby allies for 974 Health every 2 seconds for 24 seconds. Allies can also activate the Purify synergy, cleansing all harmful effects from themselves and healing for an additional 4804 Health.
While this is a nice heal over time, its not the strongest of the bunch. What it does provide is a purify synergy that can remove a lot of nasty effects and replenish your HP.
Aggressive Horn: Sound your war horn to rally your forces, increasing you and your allies’ Max Magicka, Health, and Stamina by 10% for 30 seconds. You and your allies gain Major Force, increasing your Critical Damage done by 15% for 9.5 seconds.
This is a huge DPS boost and should be used in turn with other tanks’ and healers’ horns to maximise its uptime.
Switch-In Abilities
Power of the Light: Summon an expanding beam of pure sunlight to doom an enemy, dealing 1371 Physical Damage while also copying all their damage taken for 6 seconds and releasing 20% of it as additional Physical Damage to them. Maximum copied damage: 5837. Targets are also inflicted with Minor Fracture and Minor Breach, reducing their Physical and Spell Resistance by 1320 for 6 seconds.
Only one healer needs to run this. Applies Minor Fracture and Minor Breach to the target and costs stamina to cast. If your DPS isn’t already closing on maximum penetration, this skill can help boost DPS against certain mobs and help to “mark” targets as well.
Elemental Drain: Send the elements to sap an enemy’s defenses and afflict them with Major Breach for 24 seconds, reducing their Spell Resistance by 5280. Also applies Minor Magickasteal to the enemy for 24 seconds, causing you and your allies to restore 400 Magicka every 1 second when damaging them.
Applies Minor Magickasteal but Radiant Aura already does that. What you want this for is to apply Major Breach to priority mobs and targets that the tank isn’t actively debuffing. This may include The Mage and her reflections in Aetherian Archive. This skill also costs nothing to cast.
Quick Siphon: Focus your staff’s power to apply Minor Lifesteal to an enemy for 20 seconds, healing you and your allies for 600 Health every 1 second when damaging them.
Only one healer needs to run this, if at all. Applies Minor Lifesteal debuff to the target, which basically gives a neat little heal over time to anyone attacking it. Has to be slotted on the front bar, so you must choose between moving/removing Channeled Focus or Harness Magicka to the backbar.
Rapid Regeneration: Share your staff’s life-giving energy, healing you or up to 2 nearby allies for 15360 over 16.5 seconds.
Not so much a trial ability, great in dungeons and PvP and other times where your allies are very spread out or where there aren’t many allies to heal.
Cleanse: Cleanse yourself and your group, removing 2 negative effects and reducing the duration of any further negative effects by 50% for 6 seconds. If a negative effect is removed, the target is healed for 18% of their Max Health.
This skill should only be used in certain situations where debilitating single target damage over time abilities are affecting your allies, including during the first boss of Sanctum Ophidia and generally in Maw of Lorkhaj.
